Educational researcher and theorist Robert M. Gagné observed effective teachers in action and discovered that they consistently followed a specific series of steps to make learning stick.
Gagné named and codified the steps he observed, and wrote extensively about them in his work – naming these steps the “Nine events of instruction”.
Let’s explore how you can use the 9 events of instruction to create every lesson in your course in a way that ensures your course participants will really be learning, every step of the way.
Here’s a handy breakdown that you can use to skip to a section:
| Event 1: Gain the learner’ attention | |
| Event 4: Present the instruction | |
| Event 7: Provide Feedback |
Before we get into the nine events of instruction…
What is learning?
Gagné defines teaching as “Arranging a series of events that support learning.”
But… what is learning?
Gagné tells us that learning has taken place when we observe a change in the learner’s behavior that is persistent over time.
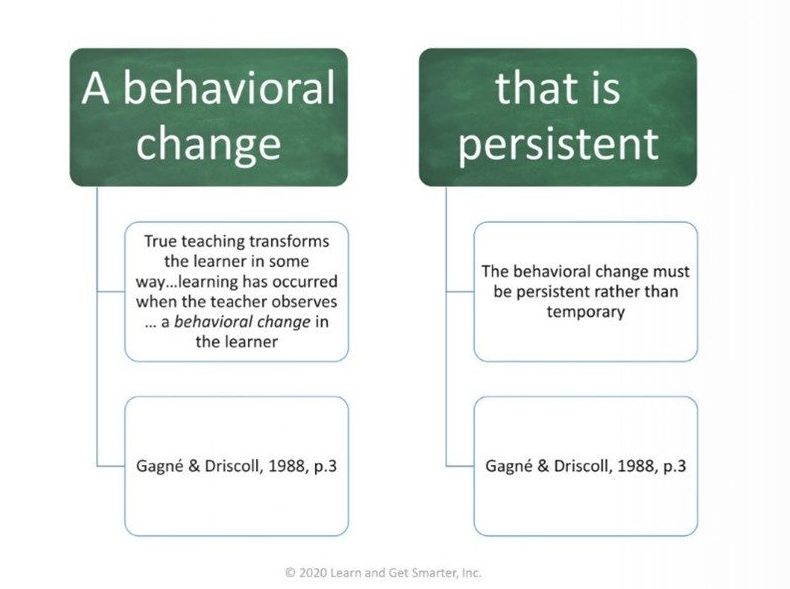
So putting it all together, we can define teaching as:
“Arranging a series of events that lead to a change in behavior that is persistent over time.”
How to use the 9 Events of Instruction to promote learning
In order for your online course to promote real transformation (which is what you’re promising your course participants), it’s not enough to just present information in a digital format.
Instead, online course creators need to arrange a series of events for their course participants to go through, a series of events that will lead to real, permanent behavior change in the learner.
In your online course you are going to arrange a series of events that will help your course participants change their lives for the better… forever!
That’s a tall order, but fortunately, Gagné’s research provides clear guidelines for how to make it happen.
An easy way to remember the 9 events of instruction is to break them down into three groups of three.
There are:
- three things to do BEFORE presenting the instruction in an online lesson,
- three things to do WHILE presenting the instruction, and
- three things to do AFTER presenting the instruction.
Notice that most people presenting instruction of any kind (online or off) only do ONE of these nine things…so think how much more effective and impactful YOUR lessons will be when you implement all nine!
So, what are these nine things?
BEFORE you present the instruction
Event 1: Gain the learner’s attention
This is critical. If you don’t have your learners’ attention, you can talk till you’re blue in the face, but no learning will happen. And in today’s busy online learning space, there are many factors competing for your learners’ attention… from whatever is going on in their actual 3D lives, to that ever-present cat video lurking in another window.
How can you compete with all that?
The marketing you do for your course is the first step in gaining your learners’ attention. Once learners are IN your course, your marketing has worked, so you know they are interested. But getting them to pay money is only the first step. Getting them to pay attention (and keep paying it, throughout each lesson in your course) is much harder.
What motivates your learners?
In gaining learner’s attention, think about what will be of particular interest to your target audience. Gagné discovered that
Curiosity, self-efficacy (being able to take effective action on one’s own) and achievement are major drivers of learner motivation (Gagné & Driscoll, 1988, pp.64-66).
- What makes YOUR ideal course participant curious?
- What gives them a feeling of self-sufficiency?
- What do they want to achieve, in your course?
Event 2: Tell them what they are going to learn
Every lesson in any online course needs to have a clear, specific learning goal. How will your course participants be different, and better, because they paid attention to your lesson? Once you’ve gotten their attention, what powerful, effective, and meaningful (to them) learning will you give them in return for that attention?
Adult learners are motivated by the desire to achieve better health, more money, more time, and better relationships. As you describe the lesson you’re setting up, tell them how it will (directly or indirectly) contribute to one or more of those four goals.
What, specifically, will learners be able to do as a direct result of this lesson?
- Will they be able to talk about information in a new way?
- Will they have developed a new skill?
- Will they be on their way to adopting a more positive mindset?
- Will they have a new way of approaching a learning task?
- Will they be able to perform a physical movement in a graceful automatic way?
Then think about how you will let your learners KNOW about the learning they are going to achieve. If you are excited about the change this lesson will make in their lives, your enthusiasm will pass through to your learners so they can get excited about it too!
Event 3: Stimulate the recall of relevant prior knowledge
The issue of prior knowledge is a very important one when it comes to learning anything new.
People don’t learn new things in a vacuum; they learn new things in relation to other things they already know.
Our prior knowledge can HELP us learn something new, or can get in the way, depending on the nature of our prior knowledge and the nature of the new thing being learned.
Let’s take an example from language learning. If you already know French, then learning Italian will be relatively easy, because French and Italian share a lot of common word roots and have similar grammatical structures. However, if you already know French and want to learn Hindi, applying the rules of French will not help you learn Hindi, and may even get in the way. This problem is so common in language learning and teaching that there’s an actual term for it: “language interference”.
So as you think about the new information you’ll be presenting to your learners in the lesson you’re creating, it’s important to think about what they already know (their related prior knowledge) in two significant ways:
- What prior knowledge do they have, that will be HELPFUL to them in learning what you’re about to teach? You want them to bring that helpful related prior knowledge to the front of their minds, because that will prime them to be ready to absorb the new material in your lesson.
- What prior knowledge do they have, that will INTERFERE with their ability to learn what you’re about to teach? You need to point out and counteract any unhelpful prior knowledge first, in order for your teaching of the new information to be effective. (You can see an example of how to handle this situation in ads and articles that proclaim, “Everything you know about XYZ is WRONG!” and then go on to present the actual, RIGHT knowledge about XYZ.)
WHILE you present the instruction
Event 4: Present the instruction
How can you determine the right way to present the instruction?
An important guideline is to present it based on the specific type of learning needed achieve the lesson’s learning goal. That will be one of the five types of learning Gagné calls “the five domains of learning”, which are:
- Verbal information (declarative knowledge): Learners will be able to talk about information in a new way
- Attitude change (mindset): Learners will change their behavior in a way that demonstrates a real mindset change
- Cognitive strategy (learning how to learn): Learners will have a new (and more effective) way of approaching a learning task
- Intellectual skills (procedural knowledge, “how-to”): Learners will be able to perform a skill, operate a procedure, or follow a set of rules
- Motor skills (physical movement): Learners will be able to perform a smooth, automatic, physical movement routine
Gagné’s research[1] suggests the key components of what works best to present instruction (and make it stick) in each learning domain, and you can use that research to structure your lesson.
Verbal information lesson
- Present verbal information in small chunks
- Provide relevant graphics to provide context
- Allow the learner to control the pace of instruction
Slides work well to present verbal information in an online course because they fulfill all three of the above criteria.
Attitudes lesson
- Present unhelpful, ineffective attitude choices the learner COULD make (and their long-term harmful effects)
- Present the correct (target) attitude choice (and its long-term benefits)
- Provide inspiring role models who have adopted the correct attitude choice
- Help learners get in touch with their “WHY” for adopting the correct choice (both their immediate short term reason and they overarching long term reason)
- Provide ongoing support for adopting the correct attitude
Cognitive strategy lesson
- Teach the strategy you want learners to use to “learn how to learn”
- Help them practice using the strategy
- Provide a way for them to get feedback on how well they did in applying the strategy
Intellectual skills lesson
- Present the concepts (big ideas) learners must understand in order to perform the skill
- Present the tools and resources learners must have in order to perform the skill
- Take learners through the specific steps involved in performing the skill
- Present any exceptions to the rules, fine-tuning, trouble-shooting or other ways to make sure learners can perform the skill under any and all conditions
Motor skills lesson
- Teach each separate component of the movement routine, one at a time
- Put the separate movements together to create a smooth routine
- Help learners practice the movement routine
- Provide immediate feedback on their practice session
- Provide continuing opportunities to physically practice and mentally rehears the routine
Here’s a helpful chart you can use to remember how to present the instruction for each type of learning.
You can learn more about how to present instruction in each of the five domains of learning, in Course Design Formula: How to teach anything to anyone online, pp. 105-149.
Event 5: Guided Practice
Simply presenting the instruction is not enough to help your course participants internalize it and use it effectively themselves. Guided practice is essential, so that you can support them in starting to state the verbal information, adopt the desired attitude, practice the learning strategy, perform the skill, or use their own muscles to perform the motor skill.
Structuring in guided practice activities in an online course involves setting up ways for learners to begin taking action on their own, with your expert guidance and support. This is a “done with you” type of experience, where you are right there with them (whether live in person in synchronous meeting, or guiding them to fill in specific responses on a document or form, or some other way).
Here’s a very simple example. Let’s say you want to teach how to write the word “radiant” in cursive. You could present the instruction by showing what the word is, adding a short video of your own hand movements as you write the word on the screen. For guided practice, you could provide a downloadable printout of the word with the letters printed in faint dotted lines, and have learners trace the letters as they fill in the dots using their own pens. You could also guide them through the activity one step at a time using video.
The important point in guided practice is to be sure you really are providing guidance and not just asking learners to perform the activity on their own, which is the NEXT step.
Event 6: Independent performance
Once your course participants have seen you demonstrate the instruction, and have had a chance to perform it with your guidance, the next step is for them to perform on their own. They will still need your support in the sense that it’s up to the instructor to create a structure for the learner’s independent performance of the skill or adoption of the new mindset. In our cursive handwriting example, you could for example provide them with a printable page that has lines they can use to gauge the height of the letters (so that “a” is half as tall as “d” or “t” for example), like the guidelines shown here.
The difference between guided practice and independent performance is that in independent performance you would not provide dotted letters for learners to trace. Instead, you would expect them to write the word on their own. It’s very important for learners to perform the skill on their own, because doing so provides a feeling of self-efficacy, which is one of the motivational factors identified by Gagné.
AFTER you present the instruction
Event 7: Provide Feedback
Once learners have performed the skill on their own, they need a way of determining whether they have done it correctly. You can help them get feedback in various ways:
- Self-reflective feedback
- Peer feedback
- Instructor feedback
- Automated feedback
The type of feedback you use will depend on the nature of the subject matter you’re presenting. In a course about health and wellness, feedback can come from tracking devices such as a Fitbit, that measures changes in heartrate for example which could be used as feedback to see if meditation practice is producing a mellower approach to life.
Another way to provide feedback in the same course would be to have learners keep a self-reflective journal and observe how they feel.
Peer feedback can be achieved by setting up study buddies, accountability partners, or discussions in an online forum or live video call.
Automated feedback comes in the form of instant grading on quizzes in your course player, or other types of technology-based methods.
It’s important to separate the feedback you help learners access about their independent performance, from the feedback they give you about how they are experiencing your course. While both types of feedback are important, they are not the same. The feedback provided here in the 7th event of instruction, is specifically feedback TO the learner about how effectively they were able to perform the learning task on their own.
Event 8: Assess Performance
What’s the difference between feedback and assessment? Feedback lets your course participants know whether they are on track to achieve the lesson’s learning objective, while assessment tells them whether or not they have actually achieved it.
So with respect to the learning goal:
- Feedback: are you on track to get there?
- Assessment: did you get there?
The assessment in your lesson must refer back to the learning goal you set up for the lesson in step 2. So for example, if the lesson’s learning objective is to gather the ingredients needed to bake a chocolate cake, the assessment must determine whether all the required ingredients have in fact been gathered.
Assessment can take many forms:
- Self-assessment
- Peer-assessment
- Instructor assessment
- Automated assessment
In thinking about how to set up the assessment for your lesson, don’t just automatically assume it will be a quiz. A quiz might be the best assessment method, but you could also use an authentic real-world assessment. For a lesson about how to bake a chocolate cake, a quiz would not really tell you whether the learner had gathered all the necessary ingredients. Requiring them to post a photo of the ingredients laid out on their kitchen table might be more effective, for example.
Event 9: Extension and Transfer
Once you’ve determined the extent to which your course participants have actually achieved your lesson’s learning goal, the next step is to encourage them to internalize the learning and use it in other contexts that go beyond this immediate lesson. In the chocolate cake ingredients lesson, for example, gathering the ingredients is only the first step in an ongoing process. Learners in that course will be using those ingredients in future lessons to actually bake a cake.
Every lesson in your course should lead directly into subsequent lessons, and also connect to the learner’s experience outside the specific context of your course. For example, in gathering the ingredients to make a chocolate cake, you may have taught a process learners can use to continually track and replenish their cake-making supplies, or to efficiently access cake making ingredients for other types of cakes. Just as you reminded your learners, in step 3, to access their relevant prior knowledge in order to learn what you were about to teach them in THIS lesson, this lesson itself now becomes relevant prior knowledge for future lessons in your course and future experiences in their lives beyond the course.
Integrating the 9 events of instruction with other frameworks
As powerful as the nine events of instruction are as a learning design framework in their own right, they become exponentially MORE powerful and useful when integrated with other frameworks. You can use the Nine Events of Instruction along with Bloom’s Taxonomy, to ensure that you are helping learners take a step-by-step approach to moving from lower to higher order thinking skills, one step at a time.
The line of understanding developed by Learn and Get Smarter, Inc. shows which levels of Bloom’s taxonomy and which of Gagné’s 9 events of instruction must be delivered and mastered, in order for learners to be ready to advance to the next step. Skipping steps or jumping from one to another without adequate preparation will lead to gaps in learners’ ability to achieve success in doing what you are asking them to do.
The Hero’s Learning Journey…using the 9 events of instruction to manage cognitive load
On the Hero’s learning journey (following the steps of Joseph Campbell’s Hero’s Journey), your learner is the hero. You, the instructor, are the mentor or guide. Cognitive load is the enemy of learning. And the 9 events of instruction create the path you take the learner on to overcome cognitive load and reap the rewards of real, transformative learning. Watch this video to learn more
Summing it all up
The nine events of instruction are one of the major tools you can use to ensure your lessons are effective and engaging every step of the way. Here are a few tips that can help you tie different events of instruction together to make the best use of this powerful tool:
- Step 1 (gain the learners attention) and Step 9 (facilitate extension and transfer):
- Relate everything in your course to motivational factors that are important to your learners. Gain and hold their attention throughout your course by showing them how achieving the learning objective for ONE lesson prepares them to take on the next, until they achieve their learning goal for the whole course… which is the transformation they signed up to learn from you.
- Step 2 (inform the learners of the learning objective) and step 8 (assessment):
- Make sure your lesson has a single, clear, learning objective
- Make sure to ASSESS whether the learner has achieved the learning objective
- The assessment must DETERMINE whether the learning objective has been achieved.
- Step 3 (remind learners of their prior knowledge) and Step 9 (facilitate extension and transfer)
- What is learned in each lesson becomes relevant prior knowledge for the next
- Step 4 (present the instruction) and Gagné’s five domains of learning
- Present the instruction based on best practices for teaching the SPECIFIC type of material it contains. You can take this quiz to determine the domain of learning (substitute the word “lesson” for the word “course” if you are designing a lesson, rather than a whole course)
- Step 5 (guided practice) and Step 6 (independent performance)
- Be sure to provide guided practice that really IS guided (done with you) before asking learners to perform the same skill on their own (done by themselves).
- Step 7 (feedback) and Step 8 (assessment)
- Feedback tells learners whether they are ON TRACK to achieve the learning goal, and suggests how to self-correct if they are off track. Assessment tells them whether they HAVE achieved the learning goal, and to what degree. So be sure to offer feedback that allows learners to self-correct, prior to assessment.
- Step 9 (facilitate extension and transfer) and Step 1 of your next lesson
- Each lesson should build on the one before it in a smooth and continuous way
References
- [1] (Gagné, R. M., Wager, W. W., Golas, K. C., & Keller, J. M. (2005). Principles of instructional design (5th ed.). Belmont, CA: Wadsworth Cengage Learning, pp. 85-102.
- Cuevas, R. F. (2019). Course design formula: How to teach anything to anyone online. Riverside, CA: Learn and Get Smarter.
- Gagné, R. M. (1972). Domains of Learning. Interchange, 3(1), 1-8.
- Gagné, R. M. (1985). The conditions of learning and theory of instruction (4th ed.). Orlando, FL: Holt, Rinehart and Winston, Inc.
- Gagné, R. M., & Briggs, L. J. (1974). Principles of instructional design. New York, NY: Holt, Rinehart and Winston, Inc.
- Gagné, R. M., & Driscoll, M. P. (1988). Essentials of learning for instruction (2nd ed.). Englewood Cliffs, NJ: Prentice-Hall.
- Gagné, R. M., Wager, W. W., Golas, K. C., & Keller, J. M. (2005). Principles of instructional design (5th ed.). Belmont, CA: Wadsworth Cengage Learning.