
If a screenshot says a thousand words, a screen recording says it all.
Whether you’re demonstrating something on a computer, creating training videos, or turning your voiceover into a video presentation, the ability to record your screen is an important component of your video production tool belt.
The bad news… There are a lot of options to choose from depending on your device, but we’ll brief you on all of them, and guide you through whichever one you pick.
The good news… Screen recording is really easy, and you don’t need to be an expert to do it!
You may not have realized that your phone and computer already have free built-in screen recording tools–so there’s a good chance you don’t need to download anything to get started.
In this blog, we’ll teach you how to create a screen recording on any device – including Mac, Windows, iPhone, or Android. There are also paid screen recording tools like Camtasia and Screenflow that allow you to edit your recordings.
Screen Recording On a computer
The process to record your screen is very similar for most devices and involves choosing the screen (or area of the screen) that you’d like to record, and your audio source.
Most people using modern Mac and Windows operating systems have screen recording functionality built-in for free. We’ll show you how to use them!
How to screen record on a Mac
If you’re using an apple computer, there are two ways to initiate a screen recording:
- Screenshot toolbar
- Quicktime player
But once you’ve launched the toolbar, the steps are the same.
- Open the Screenshot toolbar
![]()
You can access the toolbar either by using the screenshot toolbar or through Quicktime
- Screenshot toolbar – [Shift + Command ⌘ + 5]
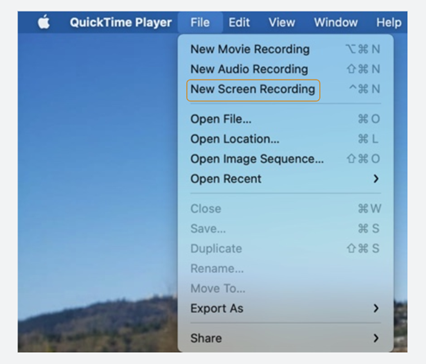
- Quicktime Player – Finder >> QuickTime Player >> File >> New Screen Recording
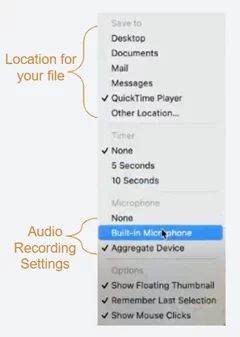
- Configure your recording options
Next, decide on your screen recording options. Think about whether or not you need to share an entire window, a tab, or a selected area of your screen.
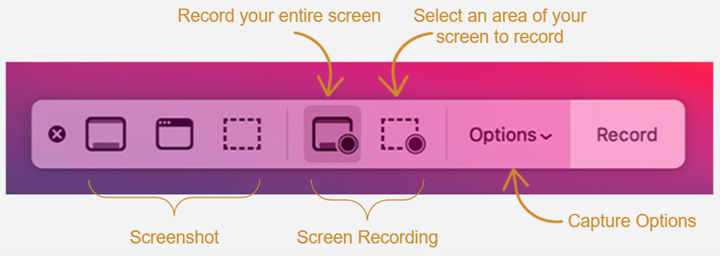
Here’s a few of the main options you’ll want to consider:
-
- Recording area: You can record your entire screen, or select a portion of it
- Audio: You can capture only your microphone or an “aggregate” of your microphone and system
- Show Mouse Clicks: Whether or not you want your mouse pointer to be visible in the recording
- Start Recording
If you’ve opted to record your entire screen, your mouse pointer will turn into a camera–click anywhere on the screen, or click record to begin.
If you’ve chosen to select an area of your screen to record, you will be prompted to select an area on your screen, like so:

- Ending your recording
Once you’re happy with your recording, there are two ways to end your recording:
- press [Shift + Command ⌘ + 5] to display the Screenrecording toolbar again, and press stop
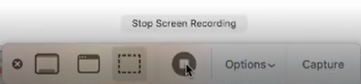
- Hover over your menu bar, and click the stop button

- Locating your recording
Once you’re done, a preview will appear in the bottom right corner of your screen, or you can find it based on where you’re specified the captures to save in the options (ie, your desktop or documents).
How to screen record on Windows
If you’re using Windows 10, you probably already have screen recording functionality built in. Depending on what you’re trying to do, you can either use Powerpoint or the Xbox Game Bar
This will help you choose the best route.
- Xbox Game Bar – The best free option for recording something on your screen – like demonstrating how to use a program on the computer, or software tools.
- PowerPoint Screen Recording – More suitable If you’re trying to record a voice-over presentation, or if you’d like to record something on your screen to embed on a slide.
Here’s how to do it both ways:
Option 1: Screen record using the Xbox Game bar on Windows 10
Typically used by gamers, Windows has a built-in screen recording tool. Despite the name, you don’t need an Xbox to use this feature.
Most modern computers running Windows 10 will work just fine, but this functionality won’t work on ALL PCs, you’ll need a video card that supports one of these encoders: AMD VCE, Nvidia NVENC, Intel Quick Sync H.260
Here are the steps to recording your screen on PC for FREE!
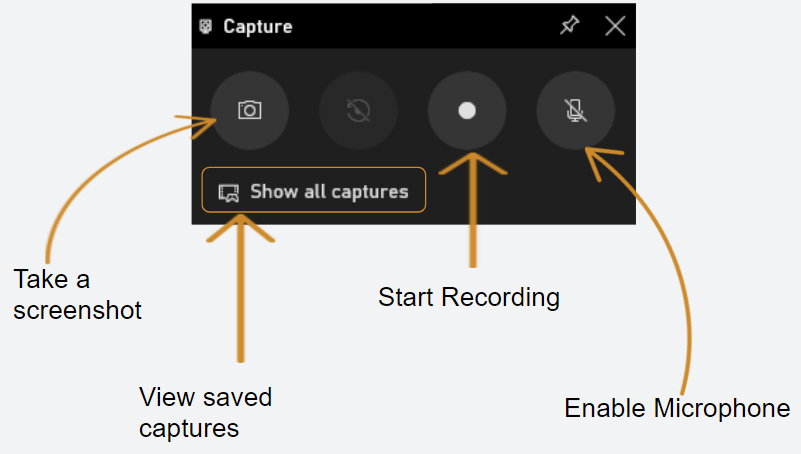
- Open the Game Bar
Hit [Windows + G] at the same time to open up the game bar, and an overlay like this will show up on your screen. Alternatively, you can search for “Xbox Game Bar” from the start menu.
Once you open it, the following overlay will appear on your screen.
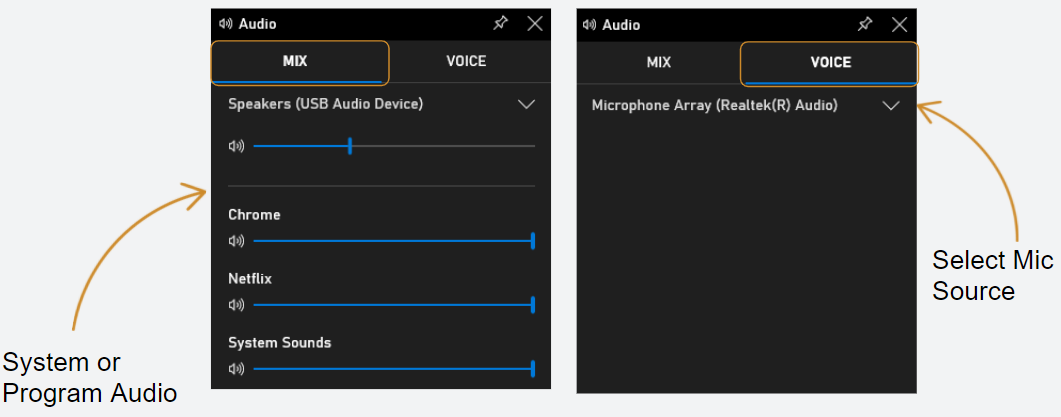
- Choose your audio and microphone settings
- If you want to record your screen and your mic, Click the Enable Microphone button
-
- If you want to capture sound from your system, or a program, use the Mix tab to select which program you want to capture audio from.
-
- If you want to use a microphone, you’ll want to make sure that the correct microphone is selected in the Voice tab
- Start Recording
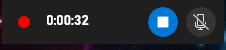
Once you start recording, a box will appear that shows you the elapsed time, and has buttons to stop recording, or enable your microphone.
- Accessing your recording
Once you stop recording, it will automatically save.
To quickly access your recordings, click Show all Captures from the capture box in the game bar.
If you’re doing a lot of recordings, it might be helpful to find where they are saved:
- PC >> Videos >> Captures
Option 2: Screen recording using PowerPoint
Next, we’ll cover how to use PowerPoint to record something happening on your screen and embed it on a slide.
By default, this will embed the recording to a slide, but you can also save the recording for use elsewhere.
- Open the slide that you want to embed the recording on
You can copy and paste the recording to a new slide, or move the slide around later.
- Click on Screen Recording from the Insert menu
On the Insert tab, you’ll find Screen Recording on the far right side of the bar

- Choose your screen recording settings
Once you click Screen Recording, a control dock will appear at the top of your screen. The following image explains your options.
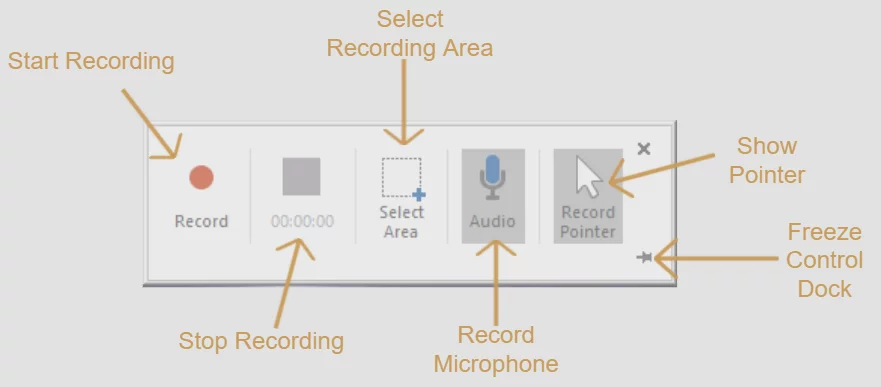
Next, we’ll run through the control dock options.
- Select screen recording area
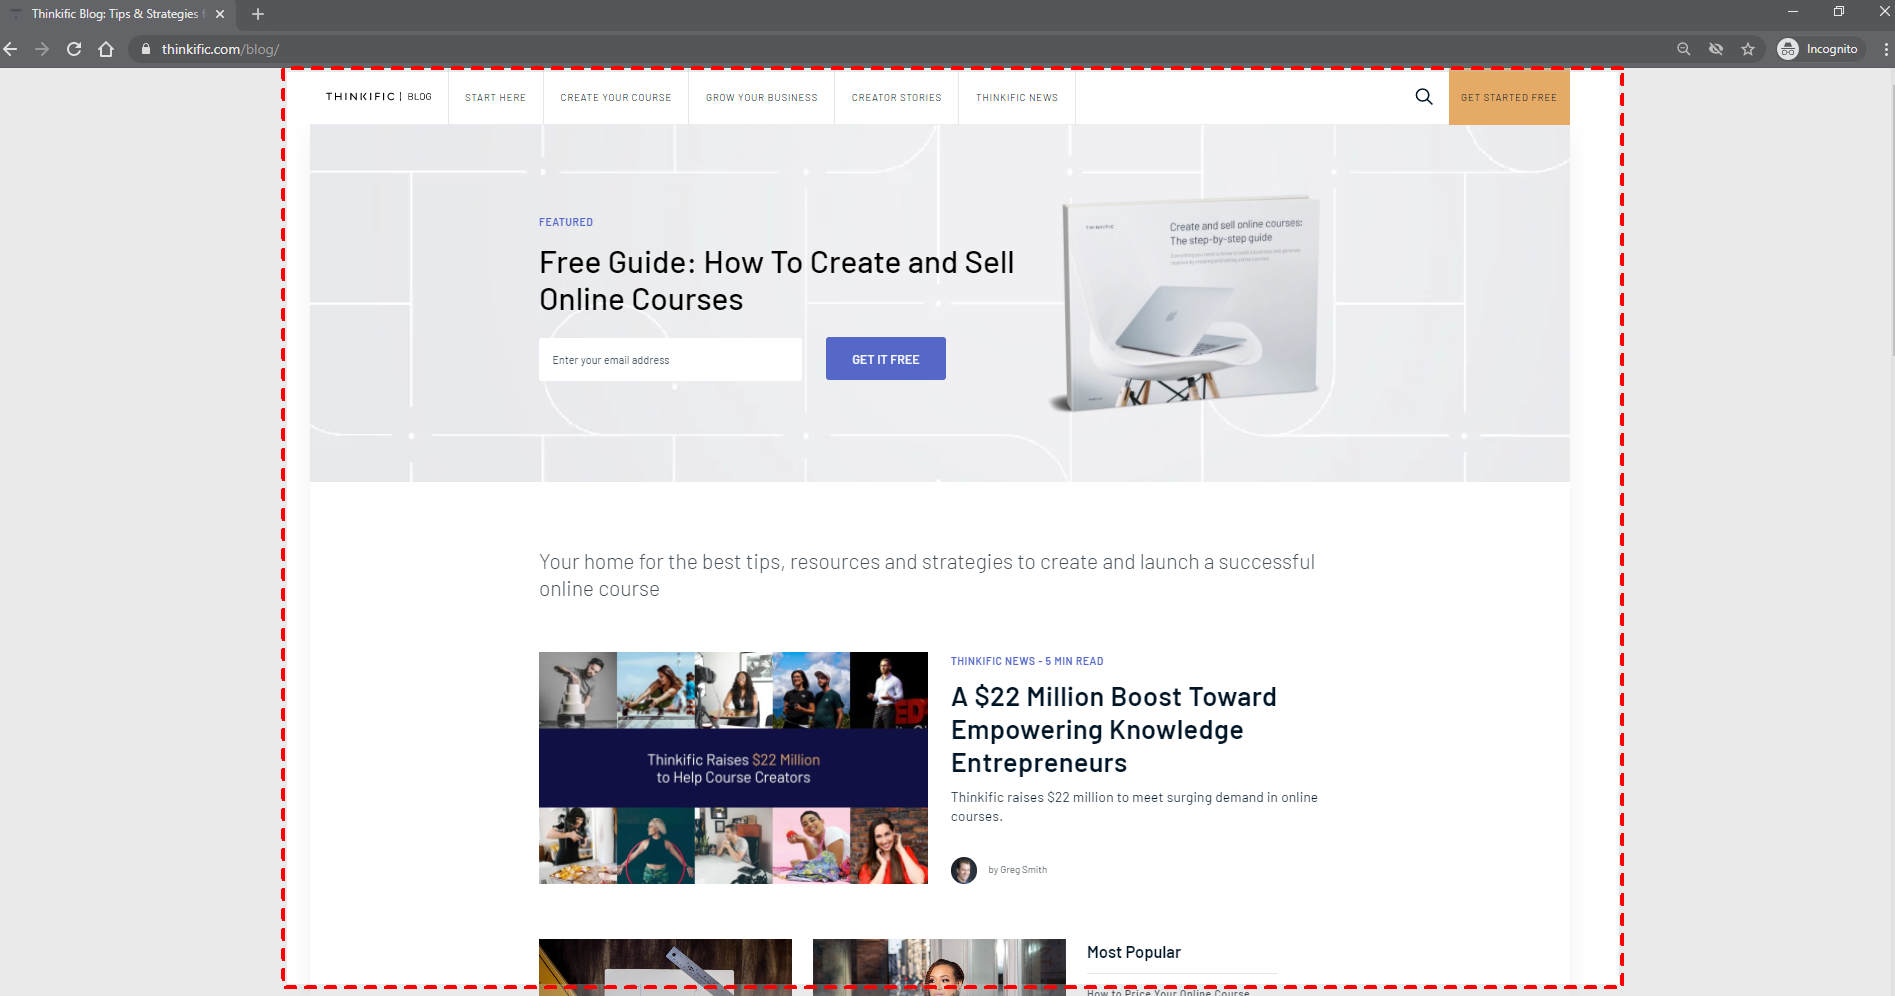
First, you’ll want to choose what part of your screen you’d like to record. You can either click the Select Area button, or use [Windows Key + Shift + A].
It’ll make for a cleaner video if you select only the area you want to record. But if you need to, you can record your whole screen if you want to use [Windows Key + Shift + F).
If you’ve opted to record only a part of your screen, you will see the cross-haired cursor, which you can drag to select your recording area. In the example below, we’ve selected the body of our blog homepage:
Here are the other options for you in the control dock:
- Audio – do you want to use your mic to add a voiceover for your screen recording video?
- Record Pointer – do you want the pointer visible in your video or not? If you’re recording how to perform a task on the computer, it’s easier for viewers to follow along with the buttons you’re clicking if you leave this on.
- Pin – When you start recording, do you want the control dock to stay in place, or disappear?
If you’re using multiple screens, you won’t run into trouble with this one, because you can record a different screen and the control dock won’t get in the way. BUT, if you’re recording the whole screen and you have the control dock pinned, it will be captured in your video.
If you choose not to pin the control dock, “esc” will not stop the recording as you might expect, so you’ll want to remember these commands:
- Windows Key + Shift + R to start and pause recording
- Windows Key + Shift + Q to stop and end your recording
- Starting, pausing, and ending your recording
To start recording, you can either click the record button in the control dock, or hit (Windows Key + Shift + R).
You can pause or end the recording using the following buttons in the control dock, or use (Windows Key + Shift + R) to pause the recording, or (Windows Key + Shift + Q) to stop the recording.

Once you stop the recording, it will be added to your PowerPoint slide. if you’re happy with it, then you’re done!
But we’ve included a few bonus steps if you’d like to make tweaks to your video, or save it to your computer to use elsewhere.
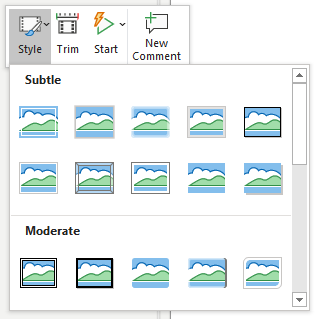
- Trim or add style to your recording
Right-click on your recording to display options. Depending on where you clicked, these options will either appear above or below the regular settings.
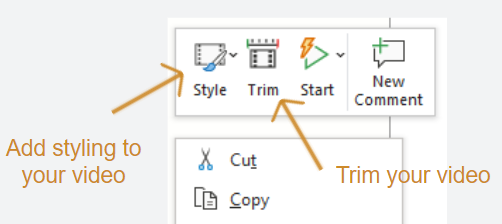
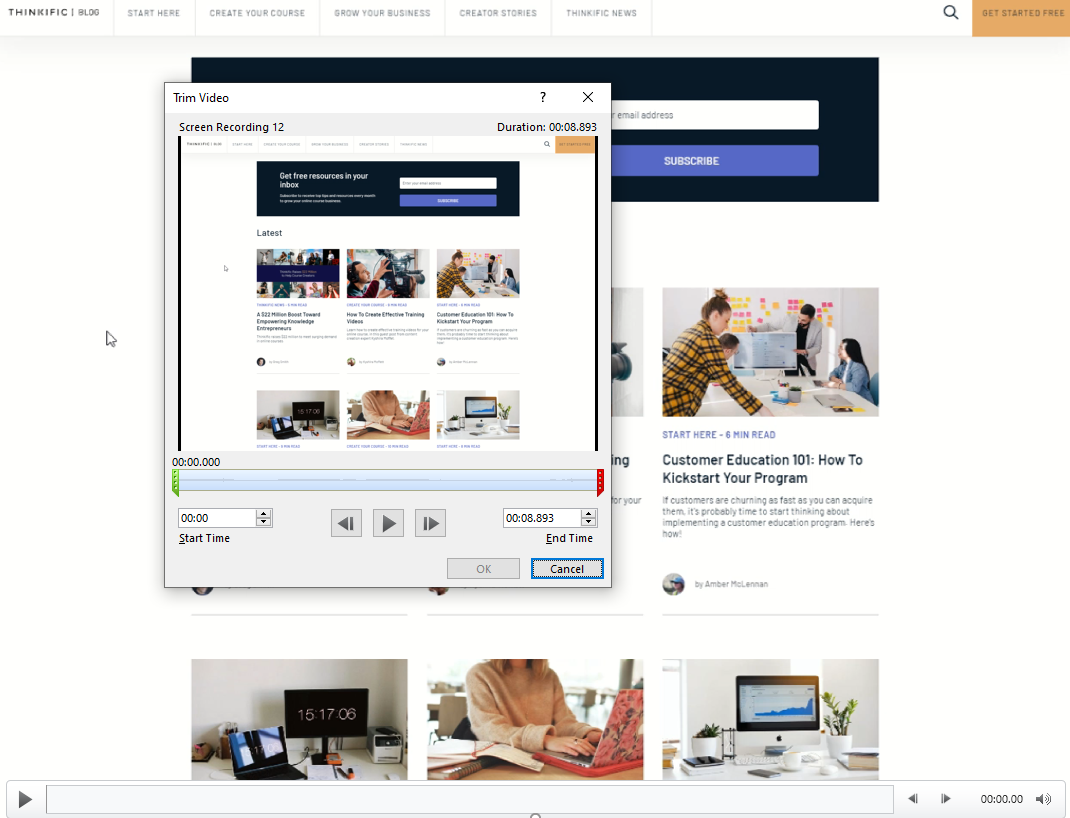
You can select the start and end times of your recording by trimming your recording. The Green line is the start of the video, and the red line is where it ends.
You can change the style of your recording to add shadows, borders, or fancy angles. Keep in mind that the angles and exotic shapes make it more difficult for viewers to see what’s happening in your recording.
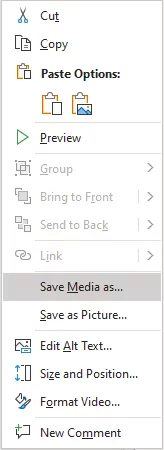
- Want to save your recording to use elsewhere?
Right-click the recording, and slick “Save Media as”, or hit M.
Best paid screen recording software options
If you’re recording and editing a lot of content, you may want to consider one of the following tools to streamline your production process.
Camtasia (TechSmith)
TechSmith screen capture software and editing solutions are perfect for anyone who wants to create and share images and videos for better training, tutorials, lessons, and everyday communication.
Their products Snagit and Camtasia are easy for anyone to learn. And with expert help content and support, you can quickly create visuals to show what you know.

ScreenFlow
If you’re a Mac or iPhone user, you may want to check out ScreenFlow from Telestream–an award-winning video editing, screen recording and sharing tool that is easy to use.
Screen recording on your phone
Next, we’ll go through the built-in screen recording functionality on iPhone and Android.
Recording your iPhone screen
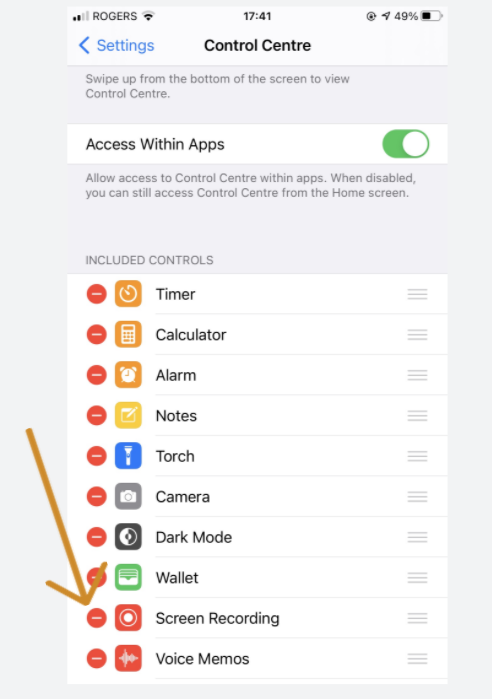
Iphones has a built-in screen recording tool, but the screen recording button doesn’t show up in the Control Center by default, so you’ll need to add it first.
- Check if you have the screen record button enabled
To open the Control Center, you’ll Swipe down from the top right corner of the screen (iPhone X or later), or swipe up if you’re using iPhone 8 or earlier. Here’s what it would look if you had the button – if you don’t see this in your Control Center, then move on to step two.
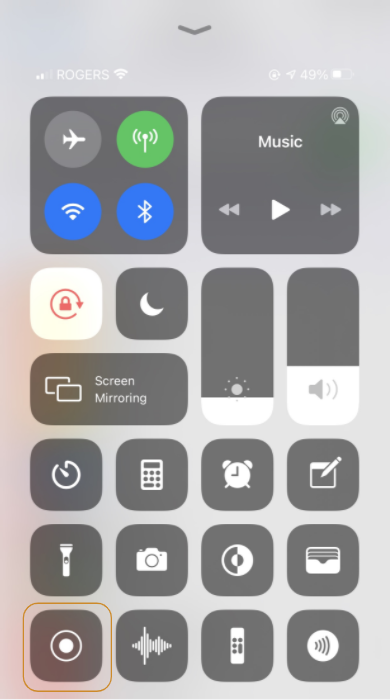
- Add the screen record button to your Control Center
To add the screen record button, go to Settings >> Control Center >> Customize Controls, and tap the ⛔ so that it turns into a Green + sign.
- Recording your screen.
Now that you’ve added the button to the Control Center, you’re ready to start recording!
But first, we recommend switching on Do Not Disturb crescent moon to avoid the risk of notifications interrupting your recording.
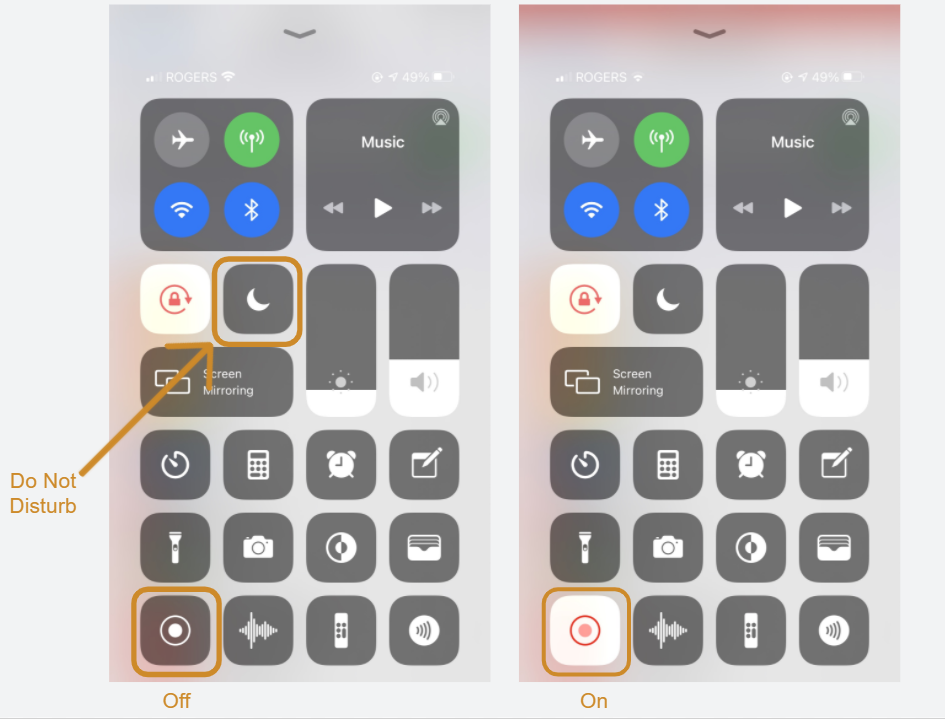
- Screen Recording on your iPhone with microphone
Once you press the screen recording button, you’ll see an option to turn your microphone on or off. Your iPhone will remember these settings next time.

- Ending your screen recording and locating your video
Once you’re done recording, swipe to the Control Center again, and tap the record button again, you will be prompted to “Stop screen recording?”
Your screen recording will automatically be saved in your Photos app.
Recording your screen on Android
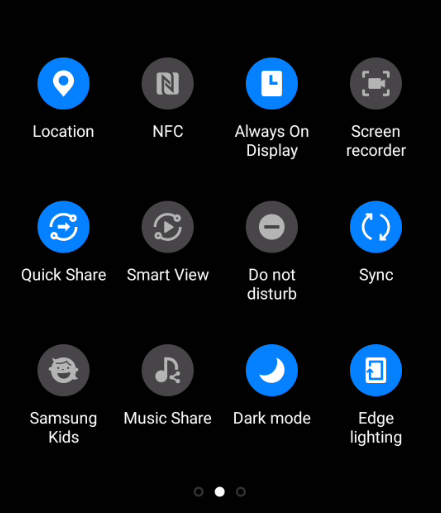
The default screen recording tool on android can be found in Android Quick Settings.
- Open Android Quick Settings, and go to the second screen
To find the default android screen recorder, open the Android Quick Settings menu by dragging your finger from the top of your screen down. This will show your notifications.
Next, swipe down again to expand the Quick Settings Menu, and then swipe left to get to the next slide. (If you’re not into swiping, you can press the middle dot at the bottom)
- Next, hit the Do Not Disturb button to pause notifications, and then click the Screen Recorder button.
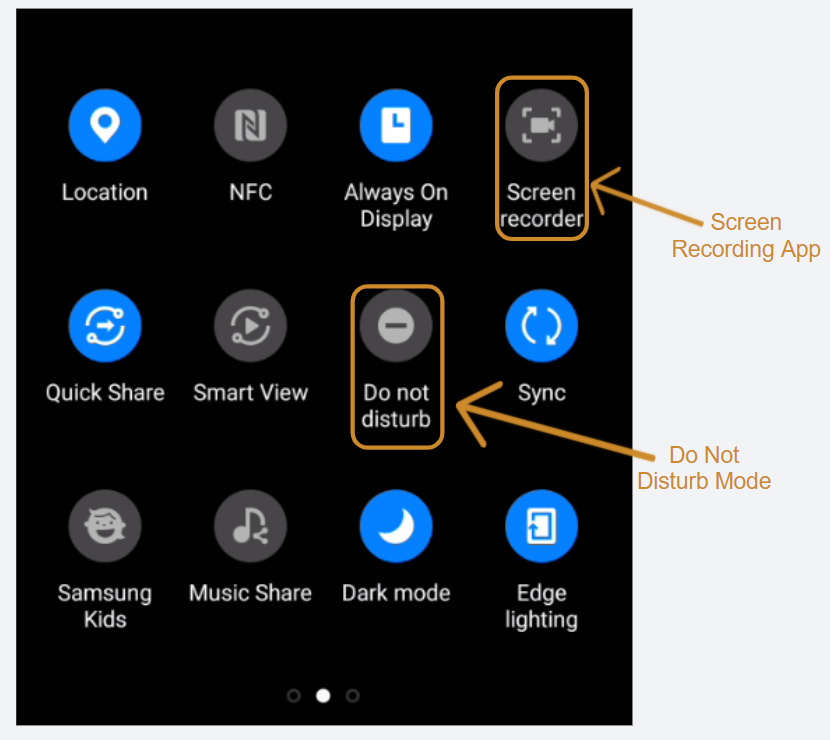
- Allow Samsung permission settings.
Click “Allow” when it prompts you to “allow Samsung capture to take pictures and record video”. If your device allows, it will also ask you to allow Samsung capture to record audio.
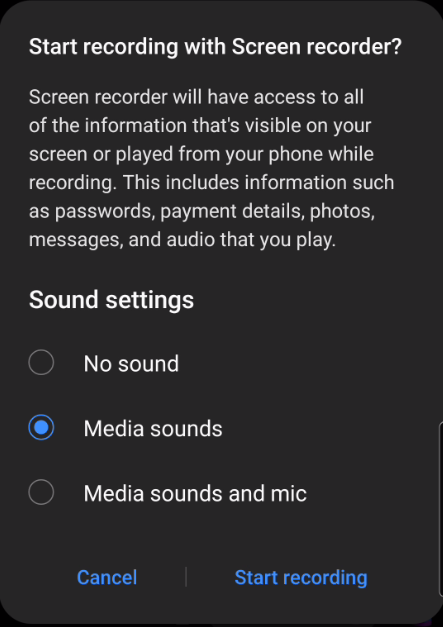
- Before starting to record, it will give you a few options for sound settings:
- No sound: Records just your screen with no audio captured.
- Media Sounds: Records sounds made by your device.
- Media sounds and Mic: Records audio from your mic, in addition to sounds made by the device.
- Next, it will display Video quality options.
The default video quality will be 1080p–there’s really no reason, besides storage space, that you’d want to change this.

- Once you click “done” you will see a countdown timer, which you can choose to skip.
- Next, an overlay will appear that allows you to pause or stop recording.

Additional overlay settings: If you want to draw on your screen, you can tap the pencil icon. Or if you want to add your face to the recording, tap the little person icon.

- Once you click stop, the screen recording file will be saved on your device with all your other photos and videos.
The last word…
Whichever route you choose to create your screen recording, you’re on the path to creating better content for your audience.
But have you considered better ways to host and monetize your content?
You can create and sell up to 3 courses for FREE on Thinkific, and test all of our core features. Try it today!