
Want the complete blueprint to selling your course using Webinars? Look no further!
That’s right! You need wasps to make sales. You know, those flying, yellow and black insects that try to sting you.
Kyshira Moffett of The Power Collecive and Carly Adams of Tity Revival know what we’re talking about. In one week, Kyshira Moffett made $15,000 in sales using automated evergreen webinars.
“Using the eWebinar app resulted in nearly $15,000 in sales within the first week. I didn’t have to do sales calls for that; all they had to do was watch the webinar, apply, and enroll.” Kyshira Moffet, owner of The Power Collective
Webinars are extremely effective. No matter what industry or niche you serve, webinars may just be the game-changing marketing channel you need to dramatically increase sales for your business. You’ve probably even attended a few webinars yourself, so you’ve seen first-hand how effective they can be.
The reason webinars work is because they provide an environment in which you can quickly earn the trust of your target audience before you ask for the sale. By watching Chris Newman valiantly vanquish a wasp, his audience saw him as a real person and immediately trusted him. You can’t get people to shell out $1,475 without building that kind of trust.
Sharing some of your best content on a live webinar for free – content that actually helps your target audience – allows you to build trust and position yourself as an authority on your topic. You get to educate and interact with your target audience, which makes selling to them so much easier. If you do it right, you’ll find that by the end of your webinar, many of the attendees will actually be grateful for the opportunity to become your customer.
From $0 to $20,000 per month in sales using webinars
To help illustrate just how powerful webinars can be, allow us to share an example from one of our customers:
John Michaloudis (www.myexcelonline.com) used our platform to create and sell his first online course. Using free webinars as his primary customer acquisition channel, John was able to go from $0 to over $20,000 per month in sales in just 6 months, enabling him to leave his full-time job to focus exclusively on teaching online (click here to download the complete case study).
But online courses are not the only thing you can sell on a webinar. Webinars can be used to sell coaching or consulting programs, live events, software, and even physical products.
However, since online courses are our primary area of expertise, for the purpose of this article we are going to focus on how to use webinars to sell online courses, and more specifically, how to sell online courses on live webinars. It is possible to generate sales using pre-recorded webinars (often called evergreen or automated webinars), but that is another topic.
We’ll start by outlining some of the main benefits of hosting live webinars, and then we’ll show you how to set one up, how to structure your presentation, and how to promote your webinar to your target audience. If you follow our advice, you can be up and running (and generating more course sales!) in no time.
Benefits of hosting live webinars
In addition to generating revenue from your online course sales, there are several other benefits of hosting live webinars. Here are a few of the main reasons why online instructors are using webinars to sell their courses:
1. Build your email list.
Webinars are a great way to build your email list because people have to register to attend your webinar using their email address. This gives you the opportunity to communicate with them directly before and after the webinar. Even if someone registers for your webinar but isn’t able to attend it, you still have a way to communicate with them.
Related: How To Build An Email List (Complete Guide)
2. Attract qualified leads for your business.
Anyone who registers to attend a live presentation about your topic is most likely a qualified lead. A person’s time and attention is one of the most valuable things they can give you. If someone willingly volunteers to spend an hour or more with you on a live webinar, you can assume that they are serious. Very few people are willing to spend an hour of their time learning something that they are not seriously interested in.
3. Connect with your audience.
Hosting a live webinar gives you the chance to build a connection with your audience by interacting with them in real time. Throughout your presentation (or after your presentation when you do a Q&A session), you will be able to answer any questions your audience asks you. Doing that helps to build trust and also helps you learn more about the needs and concerns of your audience.
4. You don’t have to be technically savvy.
Even if you don’t consider yourself to be technically savvy, you can still host a live webinar successfully. We’ll recommend some specific programs you can use to host your webinar later in this article but, for now, just know that there is absolutely no shortage of software options to host your webinar. Most of them are quite simple to use, which means you can learn to host a webinar in a relatively short period of time.
5. Keep costs low (for you and your attendees).
Webinars are essentially the equivalent of a live event, the main difference being that they are hosting virtually. This means that people from all over the world can attend your event, without incurring the travel and accommodation expenses that they would normally incur if you hosted your event at a physical location (like a hotel conference room, for example).
Many webinar programs can host 1,000 attendees or more at a time. Excluding marketing costs, your cost to host a webinar will likely fall somewhere between $0 and a few hundred dollars, depending on which program you use. When you compare that to the cost of booking and staffing a hotel conference room, you can see why webinars are extremely cost-effective.
6. Educate before you sell.
In the book Influence by Robert Cialdini, an entire chapter is devoted to discussing the principle of reciprocity. According to Cialdini, one of the best ways to sell a product or service to someone is to provide massive value to them upfront before asking for the sale. When you help someone for free, they are more inclined to reciprocate (by purchasing your product or service).
Webinars give you the opportunity to share valuable content with your audience for free before you introduce your online course to them and ask for the sale. Not all of your attendees will go on to purchase your course, but everyone who attends your webinar will benefit from the free training you provide to them during your presentation.
We spoke with Ryan Smith from Agreement Express, and he put it this way:
“Focus on providing value and educating, not pitching. Use the education in the webinar to leave a trail of breadcrumbs to your solution.” – Ryan Smith
Webinar programs and equipment (Technology)
There is definitely some software and equipment required to host a live webinar. The good news is that there are numerous options available to you, most of which are pretty inexpensive.
Basically, you will need a program to host your webinar, an account with an email marketing service provider, and a microphone and webcam to communicate with your audience. Oh, and you will need a computer or a laptop with a strong internet connection (which we assume you already have!).
We won’t get into too much detail here, but we will recommend a few of the options that we have used or that our customers have used successfully. Keep in mind that the specific programs and equipment you use to host your webinar are not nearly as important as your overall webinar marketing strategy and the content and experience you provide to your audience.
Do some research to determine which software and equipment options are a good fit for you, but don’t get bogged down by all of the options that are available. Just pick something and go with it. If you decide to use different programs or equipment later, that’s fine.
Here are some of the webinar programs we recommend:
Here are some of the email marketing service providers we recommend (by the way, we integrate with all of these):
For your microphone, we recommend using the Blue Yeti or Blue Snowball
For your webcam, we recommend using the Logitech HD Pro Webcam C920
On a side note, you may want to use 2 separate computers or laptops to host your webinar (if you can). One would be for giving your presentation (sharing your screen or presentation slides with the audience), and other would be for following a presentation script and/or keeping an eye on the question and comments that your audience types into the live chat.
We spoke with Michael Buckbee, and he shared some excellent advice to help you avoid any technological hiccups when you host your webinar:
“Practice both the actual presentation, but also with the webinar tools you’re going to use. At my last webinar, I was using a new system and had mistakenly set the slides to display on only half the screen. I had to stop and reset midway due to audience complaints. If you can, setup a second computer (or even a phone) as a guest webinar attendee and periodically check it to make sure things are working.” – Michael Buckbee
That’s it! Once you have all of these in place, you are ready to start setting up your webinar. The next step is to create a Registration and Thank You page so people can sign up for your webinar.
Your webinar registration page and Thank You page
Before you start promoting your webinar, you’ll need to create a Registration Page to send people to. This is the page that explains what your webinar is about, who is hosting it, when it is happening, etc. You’ll also want to create a Thank You page (also called a Confirmation Page) that confirms someone’s attendance after they register for your webinar and tells them what the next steps are.
To create an attractive webinar Registration Page and Thank You Page, we recommend using LeadPages. They have several templates to choose from that have already been proven to work effectively.
What to include on your webinar registration page:
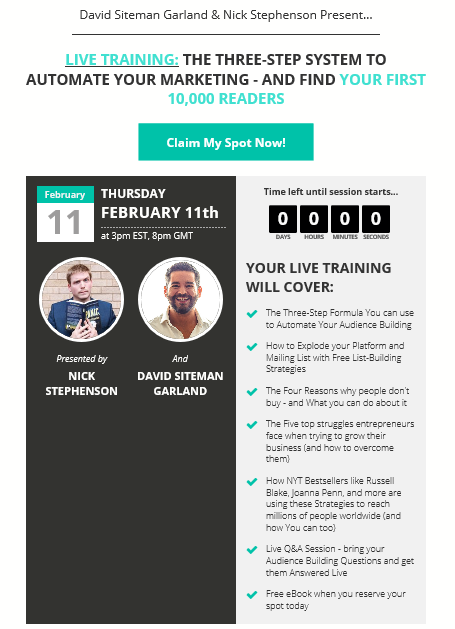
1. A compelling headline
The title you give your webinar is very important. It must be compelling and intriguing enough to make someone want to register. Don’t be vague. Make a bold promise. If someone reads your headline and still doesn’t know what the webinar is about, you’ve written a bad headline.
There is a great article about blog headlines by Brandon Gaille, one of the top business bloggers in the world. Even though the article is about creating a headline for a blog post, his tips can definitely help you create a catchy headline for your webinar.
2. Summary of topics covered
Use bullet points to describe the main topics that will be covered during the webinar. Tie each topic to a specific benefit to your target audience. We recommend including 4-6 bullet points on your webinar registration page.
3. Information about the host(s)
Include your name and the name of any co-host(s) that will be presenting on the webinar. Include an image of each host, along with their applicable title or credentials. The goal here is to position yourself (and if applicable, your co-host) as an authority on your topic.
4. Date and time of the webinar
Make sure you include the exact date and time (including the time zone) for the webinar. You can even include a count-down timer to help create a sense of urgency.
Here is an example of a webinar registration page:
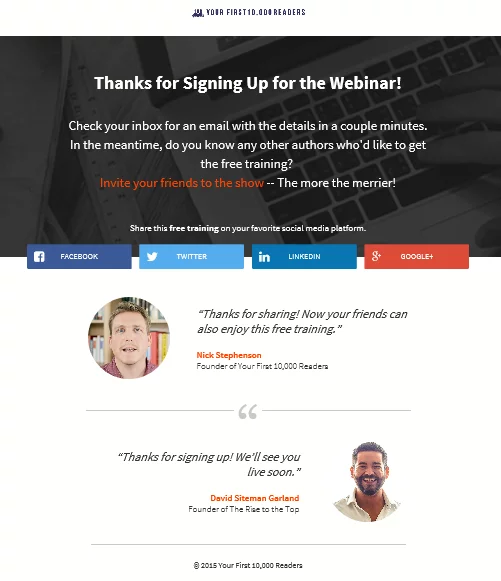
What to include on your webinar Thank You (Confirmation) Page:
1. Confirm registration
Thank the person for registering for your webinar. If you promised them a free resource in exchange for registering for your webinar (an ebook, checklist, or workbook, for example), let them know how they can download that resource. If a link to the resource was included in the confirmation email that you sent them, let me know. Alternatively, you can include a link to download the resource directly on your Thank You page.
2. Social share options
By including a few social media sharing buttons on your Thank You Page, you give the person who just registered for the webinar the opportunity to share the webinar with their network via social media. This can help increase the number of sign-ups you get for your webinar.
Example of a webinar Thank You Page:
When is the best time to host a webinar?
There isn’t exactly a one-size-fits-all best time to host a webinar, but we do have a few suggestions. The first is to consider who your target audience is and what they are most likely doing during the day and time that you plan to host your webinar.
If most of your target audience work a 9-5 job, for example, they probably won’t be able to attend a live webinar during typical working hours. In that case, hosting your webinar in the evening or even on a weekend may be your best option.
If your target audience is entrepreneurs or people who work from home, you can definitely get away with hosting your webinar during a weekday afternoon (on a Wednesday or a Thursday, for example). The best thing you can do is host a few webinars at different times to see which days and times work best for your target audience. At Thinkific, we host a live webinar every Thursday at 11am PST (2pm EST), and so far that works well for us.
Regardless of when you schedule your webinar, be prepared to start promoting your webinar 4-7 days before it starts. Don’t schedule your webinar for more than a week into the future, since most people will forget about it or make other plans by then. Strike while the iron is hot, as they say.
Sending email reminders to webinar registrants
Once you’ve set up your webinar Registration and Thank You pages, the next step is to set up your email campaigns. These are the emails that will automatically be sent to each person who registers for the webinar. There are emails you’ll want to send before the webinar, and a few more emails to send them after the webinar is over.
We spoke with Lisa Work, a photographer and web designer who regularly hosts webinars to promote her online classes, and she suggested writing all your emails in advance and then scheduling them to be sent at the appropriate times.
“I set up my reminders and follow up emails ahead of time, so I don’t forget and they are all automated. I then use previous ones as a template for new webinars – that saves tons of time.” – Lisa Work
You’ll want to create a separate email list for each live webinar that you host. Later on (after your webinar is over and you’ve taken down the replay), you can move the people who attended your webinar over to your general newsletter.
The registration confirmation email:
Immediately after someone registers for your webinar, they should receive a confirmation email. In this email, you should thank them for registering and remind them of the day and time that the webinar is happening. If you promised to send them any additional resources in exchange for registering for the webinar, include a link to download those resources in this email.
Reminder emails:
In order to maximize the attendance rate (also called the show-up rate) of your webinar, you’ll want to send out several reminder emails before the webinar starts. Remember, these are the emails that you are sending exclusively to the people who registered for your webinar (do NOT send these emails to your entire list of email subscribers).
Here is a typical frequency for webinar reminder emails:
- Reminder #1: send 2 days before webinar start time
- Reminder #2: send 1 day before webinar start time
- Reminder #3: send 2 hours before webinar start time
- Reminder #4: send 15 minutes before webinar start time
Replay emails:
Since the majority of people who registered for your webinar probably won’t attend (20-30% attendance rates are pretty standard), you should definitely send a recording of your webinar to those who were unable to attend the live training. Many of the people who did not attend your webinar will watch the replay and decide to buy your course. So if you don’t send them a link to the replay, you are literally leaving money on the table.
Here is a typical frequency for webinar reminder emails:
- Replay email #1: send immediately or as soon as the replay is available
- Replay email #2: send 24 hours after live webinar (replay reminder and expiring offer)
- Replay email #3: send 48 hours after live webinar (replay reminder and last chance to buy expiring offer)
Webinar presentation structure
Depending on the nature of your webinar topic, the way in which you deliver your presentation will vary. You can prepare a slideshow presentation using PowerPoint or Keynote, you can share your screen to demonstrate certain tasks or programs, you can do a live video stream using your webcam, or some combination of any of these methods.
If you’re going to do a slideshow presentation, we highly recommend reading this article about slideshow presentations by Seth Godin.
Regardless of which method(s) you choose to utilize during your webinar, you should definitely try to generate sales at the end of your webinar. It would be a shame to spend all this time and energy (and money!) promoting your webinar, creating your presentation, and sharing amazing content with your audience, only to generate zero dollars in course sales at the end of your presentation.
Contrary to popular belief, you do NOT need to be an expert salesperson to sell your online course on your webinar. You just need to follow a proven structure that ensures a smooth transition into the “sales pitch” part of your presentation that does not require you to be inauthentic, sleazy, or use high-pressure sales tactics in order to generate sales.
“If you ask someone to take one big action (“stick around for another 30-45 minutes”), they’re not as likely to follow through as they are if you ask them to take a series of smaller actions (“stick around for five minutes,” or “ask a question”). These smaller actions are called micro-commitments, and they take advantage of the fact that once a person says they’ll do something, they want to do it.” – Kelso Kennedy
The presentation structure we’re about to share with you is the structure recommended by Lewis Howes. Lewis has been selling his online courses using webinars for several years. He’s hosted hundreds of webinars, generating over 7-figures in online course sales in the process.
The length of your webinar will vary (we suggest 60-90 minutes in length), but as a general rule, your presentation should be 80% content, and 20% selling followed by a question and answer (Q&A) period at the end.
If your presentation lasts 60 minutes, here is what this structure would look like:
1. Meet and Greet (5-10 minutes before the webinar start time)
- Check to make sure your audio and video is working
- Welcome attendees who are arriving early
- Encourage people to share the webinar on social media
2. Introduction (5 minutes)
- Introduce yourself (briefly)
- Housekeeping and request to remove distractions
- Tell them what the webinar is about
- Tell them who the webinar is for (and not for)
- Share the goals for the webinar and agenda
3. Your story (10 minutes)
- Introduce yourself and share credentials for credibility
- Share the struggle you faced
- Share the transformation you went through
- Share the result you achieved
4. Main content (30 minutes)
- Deliver on the promise of the webinar
- Provide proof (stats, examples, case studies, etc.)
- Break up your big idea into smaller, actionable steps
5. The pitch (15 minutes)
- Introduce your course (the perfect solution!)
- Show them what is included
- Tell them the price of your course
- Include testimonials from other customers
- Show them the bonuses that are included (show the dollar value of each bonus)
- Present a webinar-only price for your course and all the bonuses
- Offer a guarantee (ie. 30-day money back guarantee)
- Create legitimate urgency (ie. offer a fast-acting bonus to first 10 customers)
- Call to action (give them a link to your check-out page)
6. Q&A (15 minutes)
- Answer any questions or concerns your attendees have
- Congratulate people who buy (call them out by name)
- Thank everyone for their time and close the webinar
“Have the webinar be SUPER valuable and packed with useful content. Make sure your topic feeds perfectly into your course and then don’t be afraid to really pitch it – share the benefits of your course and show people how to sign up and what to do next.” – Lisa Work
Additional tips for increasing sales on webinars
A huge mistake that people make when hosting a webinar is rushing through the “sales pitch” part of it because selling makes them feel uncomfortable. They love to teach their audience, so they do a great job of providing valuable content throughout their presentation, but when it’s time to present their course, they get nervous and lose their confidence, and their audience can tell.
When you follow the presentation template we outlined above (and you provide a ton of value to your audience throughout your presentation), you’re giving your audience the opportunity to delve deeper into your topic by purchasing your course comes across as a natural next step. You are inviting them to become your customer. You do not need to hard sell.
Here are some tips to help you maximize your course sales from your webinar:
1. Turn on your webcam before you start your presentation.
A great way to build rapport with your attendees and show them that you are, in fact, a real person before you begin your presentation is to turn on your webcam during the Pre-Chat so that the attendees can see you. Spend a few minutes chatting with people, thanking them for attending, asking them where they’re from, etc. before you turn off your webcam to begin your presentation.
2. Offer a satisfaction guarantee.
After you present the price of your online course, offer a satisfaction guarantee (for example, a 30-day money back guarantee) to remove the risk of buying from you. Yes, there’s a tiny risk that some people will take advantage of this guarantee and ask for a refund shortly after taking your course, but more people will buy your course because you offered the guarantee versus if you did not. So in the end, you come out ahead.
3. Leave your offer page up during the Q&A session.
After you finish presenting your course and you transition into the Q&A period of your webinar, make sure you leave the slide that shows the link to your course checkout page on the screen. Some people will decide to buy your course during the Q&A session, so you want to make sure they know exactly where to go to do so.
4. Include time-sensitive bonuses for buying.
An effective way to encourage your webinar attendees to buy your course immediately after attending your webinar is to offer time-sensitive bonuses. Some examples of bonuses you can offer include a private coaching call with you, discounted (or even complimentary) access to additional courses you’ve created.
If you give your attendees a specific deadline to purchase from you in order to receive the bonuses, make sure you honor that deadline. Do not give the same offer to someone who purchases after the deadline has expired, or you will lose credibility with your customers.
An easy way to set this up is to create a special course bundle consisting of the one you’re pitching along with any additional courses, ebooks, coaching or other bonuses. You can then take this page down after your deadline so that no one else has access to it.
5. Offer a payment plan.
In many cases, there will be people who attend your webinar and watch your sales presentation at the end who want to purchase your online course but cannot afford to pay for the entire course upfront. For that reason, you should always offer the choice between paying for your entire course upfront or paying for it over an extended period of time with a monthly payment plan.
For example, if you sell your course for $497, you can give your customers the option to pay for the entire course upfront or 6 monthly payments of $97 each. If they take the monthly payment option, they end up paying more for your course ($97 x 6 = $582), but spread over a longer period of time.
6. Offer a discount.
If you don’t have additional bonuses to sweeten the deal, you could also try offering a time-sensitive discount. Of course, you run the risk of making less if people were going to buy at full price anyway, so only try this if you haven’t had luck with the full-price option.
You can create a coupon code that automatically expires after a certain time to generate that urgency.
7. Record the webinar.
Since a significant portion of your course sales will likely come from people who watch the replay of your webinar, it is very important to record your webinar so that you actually have a replay to send them! After your webinar is over, email the link to the replay to everyone who registered for the webinar.
8. Have fun!
The last tip we can share with you to make the experience of hosting a webinar more enjoyable for you and for your attendees is to have fun with it. Don’t be afraid showcase your personality on your webinar. Be excited. Share a few stories. Bring a wasp along. Tell a few jokes (appropriate ones, of course!). If you don’t enjoy hosting your webinar, your audience probably won’t enjoy attending it.
“If you can bring the energy and sprinkle in some humor, then people will be much more engaged and it will make it so much easier to attract sales.” – Johnathan Dane
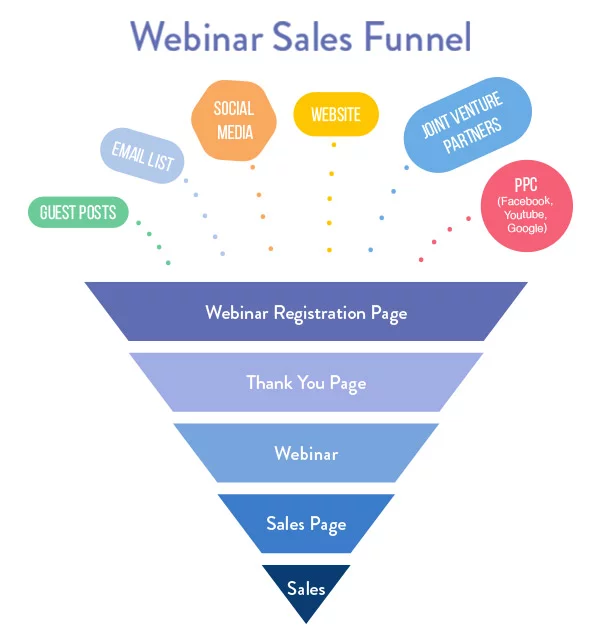
6 ways to promote your webinar
Setting up your webinar and creating your presentation is definitely a lot of work, but if you do it properly, it will all be worth it in the end. Once everything is ready to go, the final step is to invite people to attend your webinar! Basically, you want to get as many people as possible to visit your Webinar Registration Page. This is known as generating traffic.
Here are some ways to promote your webinar and generate traffic to your webinar Registration Page:
1. Your email list
Your email list is definitely a great place to promote your webinar. These are people who know, like, and trust you (hopefully!), and they have given you permission to communicate with them. However, do keep in mind that not everyone on your email list will be interested in your webinar, so don’t send them too many emails about your webinar or you will risk losing subscribers.
A good rule of thumb is to send 2 emails about your upcoming webinar to your list. In the first email, share a story that naturally leads into an invitation to attend your webinar. Outline the topics that will be covered on your webinar, and include a link to your webinar registration page.
After a few days, send a reminder email to the people on your list that did not register for your webinar after receiving that first email. Again, outline the topics that will be covered on your webinar, and include a link to your webinar registration page. Some people will appreciate the reminder, especially if they missed your first email and really want to attend. Others will read the email and still choose not to attend, and that’s okay too. Maybe it just isn’t a topic they are interested in at the moment.
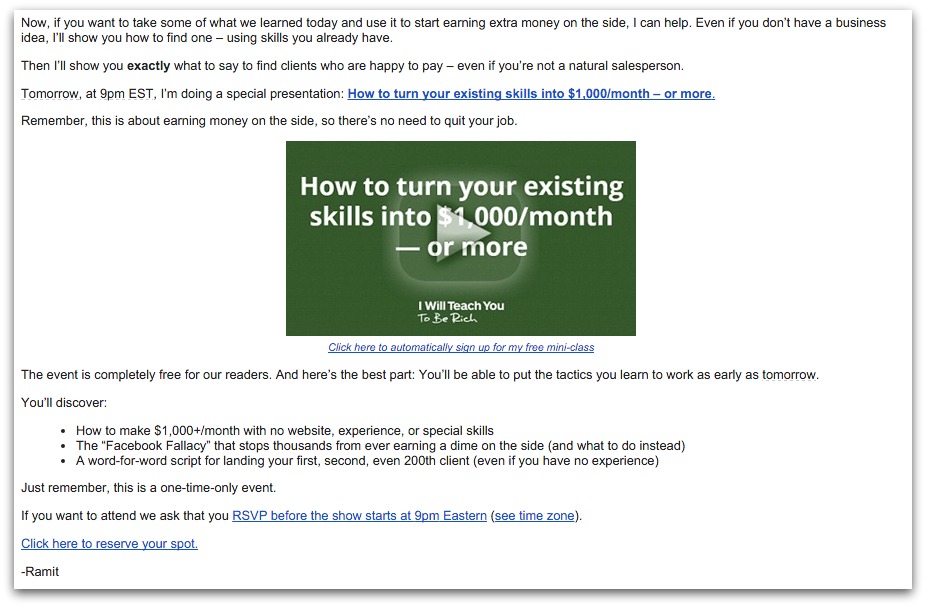
Ramit Sethi has perfected the webinar promotion email. He sends out emails that are as long as an entire post and explains a concept in them. Then, at the end of the email, he invites people who want to go deeper to a webinar around that concept. A really cool thing he does is automatically register people for the webinar if they click on his CTA, instead of making them go to the registration page and fill out their emails again.
Related: How To Build An Email List (Complete Guide)
2. Your website
You should definitely use your website to promote your webinar, and there a couple of places throughout your website where you can do this:
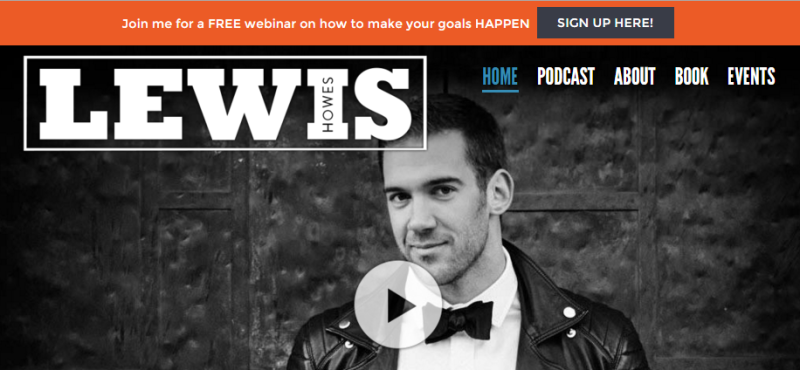
The top bar of your website
Add an invitation to register for your webinar to the top bar of your website (remember to use a compelling headline!). Include a link to your webinar registration page. Some WordPress themes will let you do this, but if yours doesn’t, HelloBar is a great option.
Here is an example of a webinar invitation that Lewis Howes used on the top of his website:
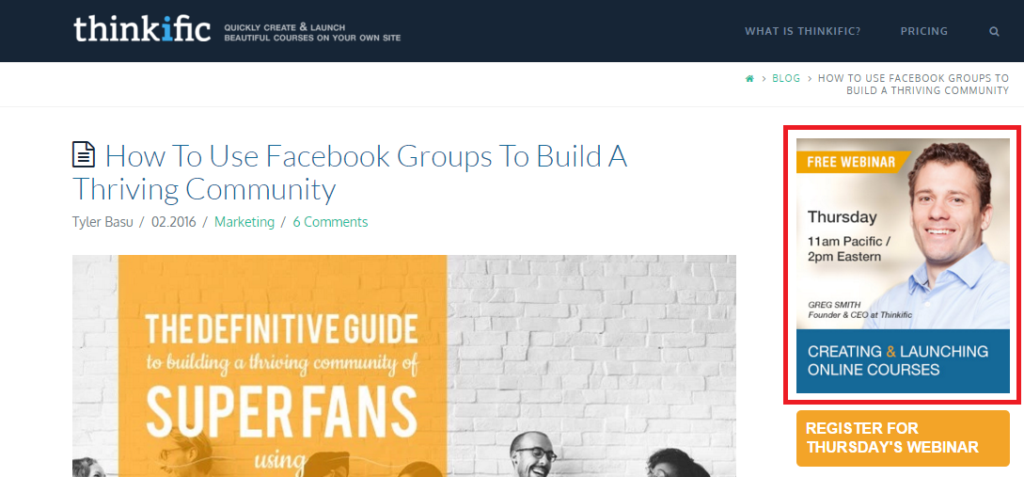
In your sidebar
Add an image that promotes your webinar to the sidebar of your website. When someone is reading an article on your blog, for example, they may see that image and decide to register. We use an image in our sidebar to promote the live webinar that we host every Thursday, as you can see below:
At the bottom of your blog posts
Another great place to invite people to attend your webinar is at the end of the articles on your blog. Consider adding a text invitation, or an image to make it really obvious.
In a popup box
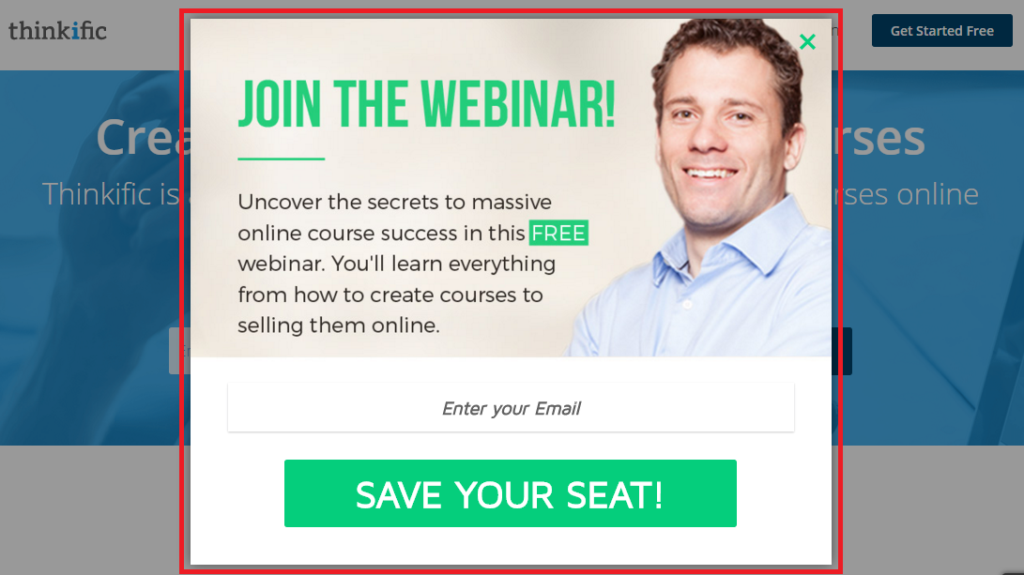
A popup box on your website is also an effective way to promote your webinar because it forces your website visitors to decide whether or not they want to attend. With the other methods listed above, there is a chance that your website visitors won’t actually notice them. It’s hard to miss a popup. You can configure it to appear after a certain period of time, or just before someone tries to leave your website.
Here is an example of a popup we have used on our website to promote our webinar:
3. Facebook Ads
Facebook ads are a great way to promote your webinar to a specific target audience because you can target people based on their demographics, specific interests, etc. Keep in mind that Facebook’s advertising platform is very robust and there is definitely a learning curve, so you should test a few campaigns on a small scale before you spend a significant amount of money on a campaign. You may even want to hire a Facebook Ads expert to help you out with this.
If you run an ad to people who don’t know who you are (cold traffic), instead of promoting your webinar to them, promote a free gift that is helpful to them (like an ebook, cheat sheet or a checklist). After they download your free gift, invite them to your webinar. They are more likely to register for your webinar at that point since you just gave them a free gift (remember the principle of reciprocity?).
If you run a Facebook ad directly to your webinar registration page, it’s best to target people who already know who you are (warm traffic). Create a custom audience of people who already like your Facebook Page, have visited your website recently, are subscribed to your email list, or a combination of all of these criteria. If you haven’t already, make sure you install a retargeting pixel on your website so Facebook can track who visits your website.
Also, try experimenting with video ads on Facebook. Chris Newman from CineChopper found that regular ads weren’t very cost-effective and a one-minute video ad converts a lot better.
Related: 3 Ways To Generate Leads With Facebook Ads For Your Online Course
4. Social media
Social media can be a great place to promote your webinar as well. But make sure you are strategic about it. Don’t spam your friends or followers with constant posts about your webinar, and make sure you create unique posts that are appropriate for each platform.
On Instagram, for example, you could include a link to your website or webinar registration page in your bio, and then post an image that promotes your webinar and invites people to click on the link in your bio.
On Twitter, you could schedule a series of Tweets to go out over a few days, each sharing a specific tip that is relevant to your webinar topic, along with a link to your registration page.
On Facebook, you could create a post to invite your friends or followers to attend your webinar. Tell a quick story that transitions naturally into your webinar invitation, and include an image in your post so that it is not just a text post (images get more engagement on Facebook).
On Youtube, you can mention the webinar in an outro and link to your registration page at the end.
As Grant Cardone, international sales training expert and best-selling author of The 10X Rule, says:
“Promote relentlessly on every line available. You will fail if you don’t push hard enough. I use every possible line to communicate the upcoming live webcast event. Twitter, Google, Youtube, Facebook, Anchor broadcast, Snapchat, Blab, email list – you name it I use it. If you believe in your product and have a great offering then you have a responsibility to make sure the world knows about it and signs up for it.” – Grant Cardone
5. Guest blogging
If you don’t have much of an audience yet, piggyback off someone else’s! With guest blogging, you can land yourself on a high-traffic website and, hopefully, bring some of that traffic back to yours.
Start by finding some popular blogs and sites in your niche and reach out to them with a guest post pitch. Follow this guide from Mirasee for best results.
Include a link to your website or a link to your webinar registration page in your bio that appears at the bottom of your article. Make sure your article is helpful to your target audience and relevant to your topic. This will ensure that the people who decide to click on your bio to learn more about you are actually in your target market for your online course.
6. Promotional partners & joint ventures
This strategy is great if you don’t have a large audience, or you’ve already promoted your webinar to your audience. Basically, you find someone who also serves your target market but who isn’t a direct competitor of yours. Tell them about your webinar (and your online course), and ask them if they would be interested in promoting your webinar to their audience in exchange for a percentage of any course sales that are generated on the webinar.
This strategy works best when the person you reach out to co-hosts the webinar with you. Since they’ve likely spent several years establishing trust with their audience, you want them to co-host the webinar so that they can introduce you to their audience before you begin your presentation. This is very important. A personalized introduction from that person helps to edify you and quickly earn the trust of that person’s audience.
To take it a step further, you can even spend some time before the webinar to chat with this person and ask them questions about their audience. The more you know about their audience, the more you can customize your presentation to speak directly to that audience’s needs and desires.

Note: This blog post was originally published in February 2016, and updated in September 2021.