YouTube is the most popular video sharing platform in the world, and it keeps growing year-to-year, reaching nearly two billion users in 2021.
For video content creators worldwide, it means that their videos face more competition than ever. To stand out and be noticed, you don’t only need regularly upload videos — it’s also important to make sure they are well-edited and look professional too.
How do you edit your YouTube videos?
There’s lots of video editing software for YouTube you can use (we’ll discuss it below), but it’s best to start with what you already have — YouTube Studio Editor.
The YouTube video editor is available on all YouTube channels for free, and is very intuitive and easy to use. You can do all the basic edits, such as trimming and adding an end screen, right inside YouTube without relying on any third-party video editing tools. Here’s how.
How to edit YouTube videos using YouTube Studio Editor
YouTube Studio Editor is part of your YouTube channel. To access it:
- Go to youtube.com and sign in to your account as usual
- Click your avatar in the top-right corner and pick YouTube Studio
- Navigate to Content in the sidebar
- Click Details on any of your uploaded videos
- Go to Editor in the sidebar
Now you’re ready to make changes to your videos for YouTube.
- Trim the beginning or end of your YouTube videos
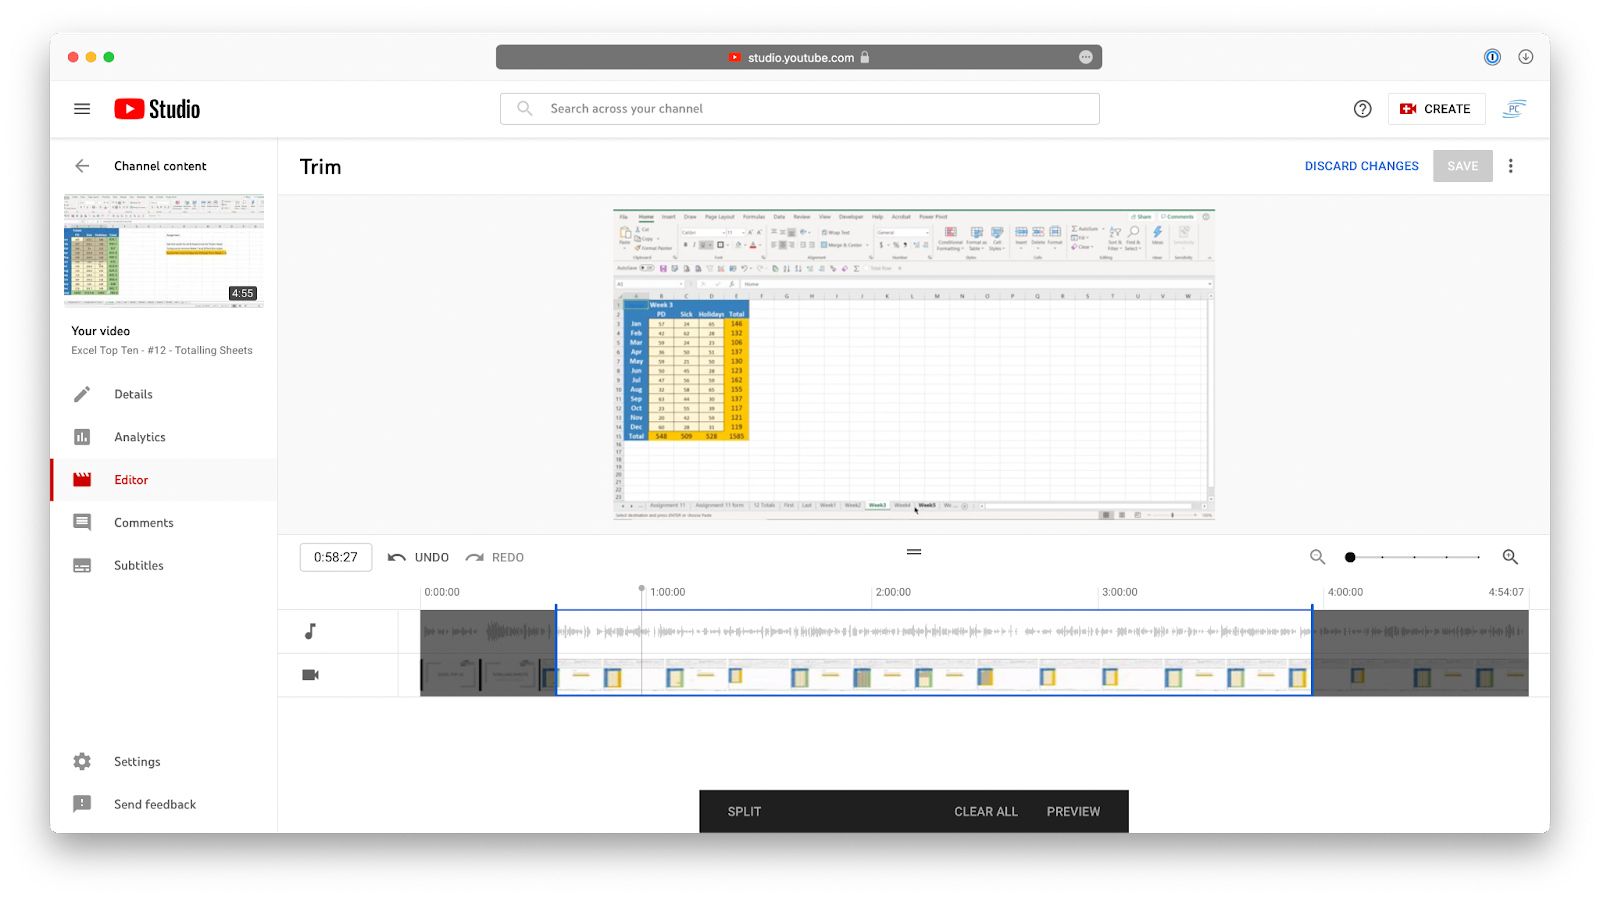
The most common edit you should make with all uploaded YouTube videos is trimming the beginning or end. Trimming lets you focus your videos on the most engaging and important parts, which makes your content more interesting as a result!
Here’s how to edit a YouTube video with trimming:
- In the YouTube Studio Editor, click Trim
- Drag the beginning or end of your video timeline to the right spot
- Click Preview
- Click Save
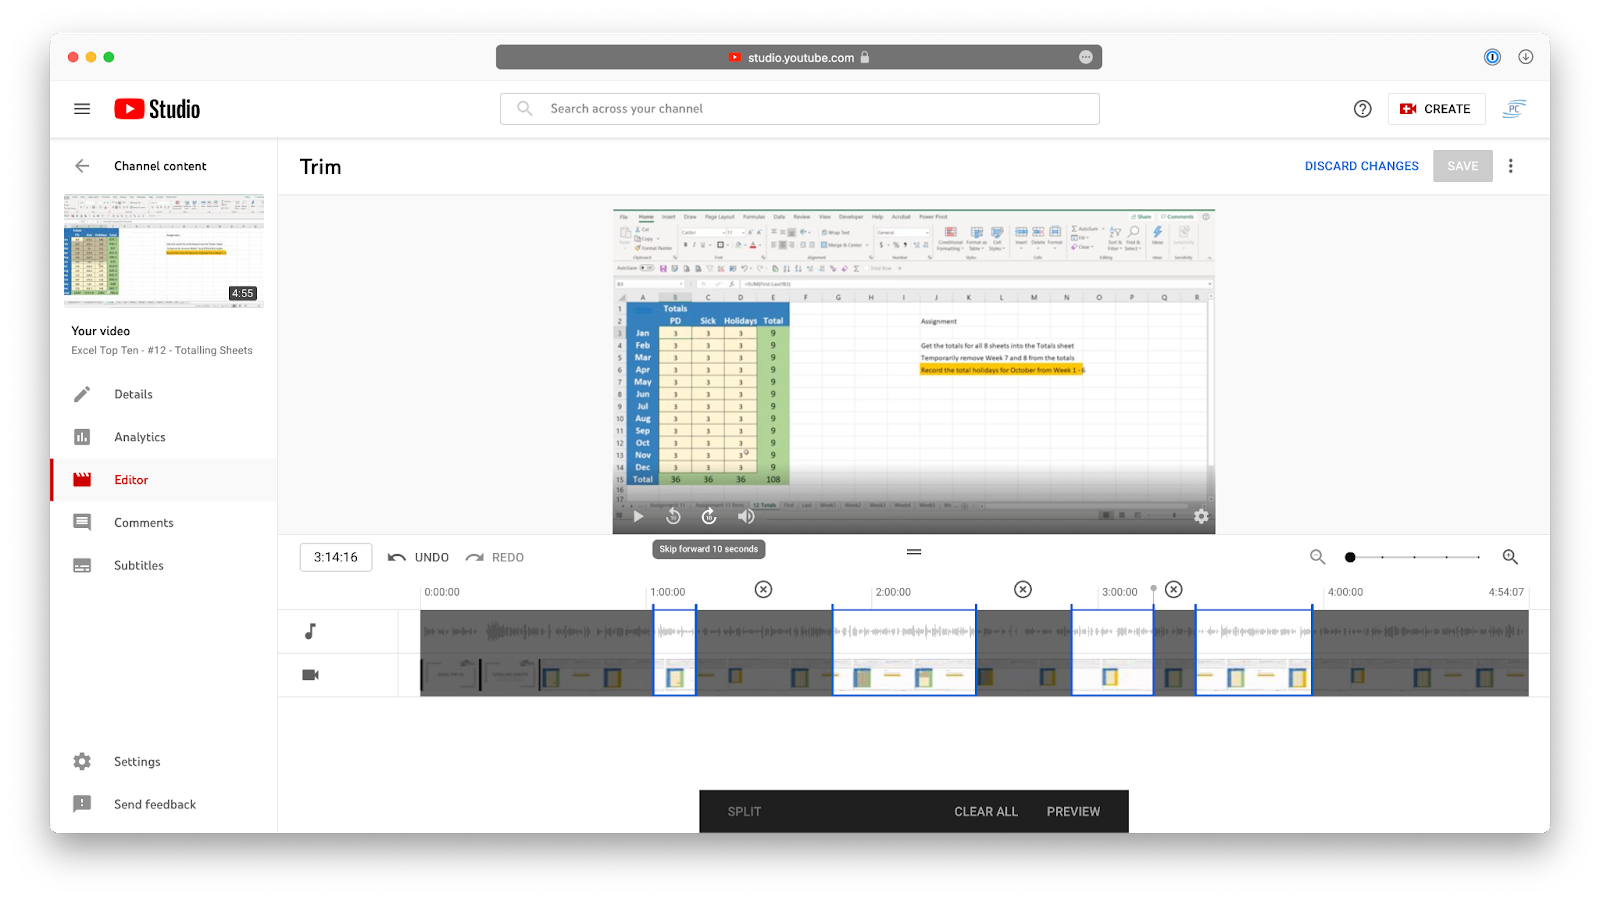
- Trim the middle of your YouTube videos
Most of the time, it’s not only the beginning and end of your videos that need to be trimmed. There might also be some long takes in the middle that could be shortened for a better pace of video.
To your YouTube videos in the middle:
- Choose a video you’d like to edit in the YouTube Studio Editor
- Select Trim
- Click at the point in the timeline which you’d like to trim
- Press Split
- Drag the split point in either direction
- Create as many extra splits as needed
- Click Preview and then Save
- Add an end screen to your YouTube videos
If you have a YouTube channel, you want your viewers to stay engaged, even after they’ve watched one of your videos. The best way to do so is to add an end screen to your videos, recommending your audience to watch another video from your library. That way, your viewers are more likely to watch a few videos in a row and maybe even subscribe!
Adding an end screen to your videos is easy:
- Open your YouTube Studio Editor
- Select a video
- Click End Screen
- Pick the kind of an end screen action you’d like to see: a template, video, playlist, subscribe button, channel link, etc.
- Select the placement and timing of your end screen on the timeline
- Click Save
How to edit videos on YouTube so that viewers watch ’till the end
The first step to creating a YouTube channel people are going to like is regularly shooting and uploading new videos. However, if your video content is good (but the videos themselves feel overly long and raw), you’ll lose audience members quickly.
To have your viewers watch videos till the end every time and engage with your content, just follow a few easy rules.
1. Keep it simple
Some creators think that putting a lot of effort in and overdoing it in post-production is the key to success. That’s when you see videos with lots of transitions, multiple soundtracks, expensive stock footage and text overlays.
While having well-edited videos is important, you should make sure that the focus stays on the content of the video, not on all the glitzy elements around it.
2. Tell a story
Every video should have a concept and a story. What are you trying to say? Why is it interesting to others? How is your video changing its audience?
Your story should have a structure (a beginning, middle and end) and be engaging enough for people to want to come back and watch another video.
Even better when you can create your own style and your story is overarching throughout your whole channel.
3. Crop your videos
As shown above, cropping videos is essential. You never want to add videos to YouTube straight from your camera — what are the chances that they contain no filler?
So feel free to crop a lot to get to the essence of your video content. If you have to crop a 10-minute video to just 3 minutes, so be it. Your channel will be much better for it.
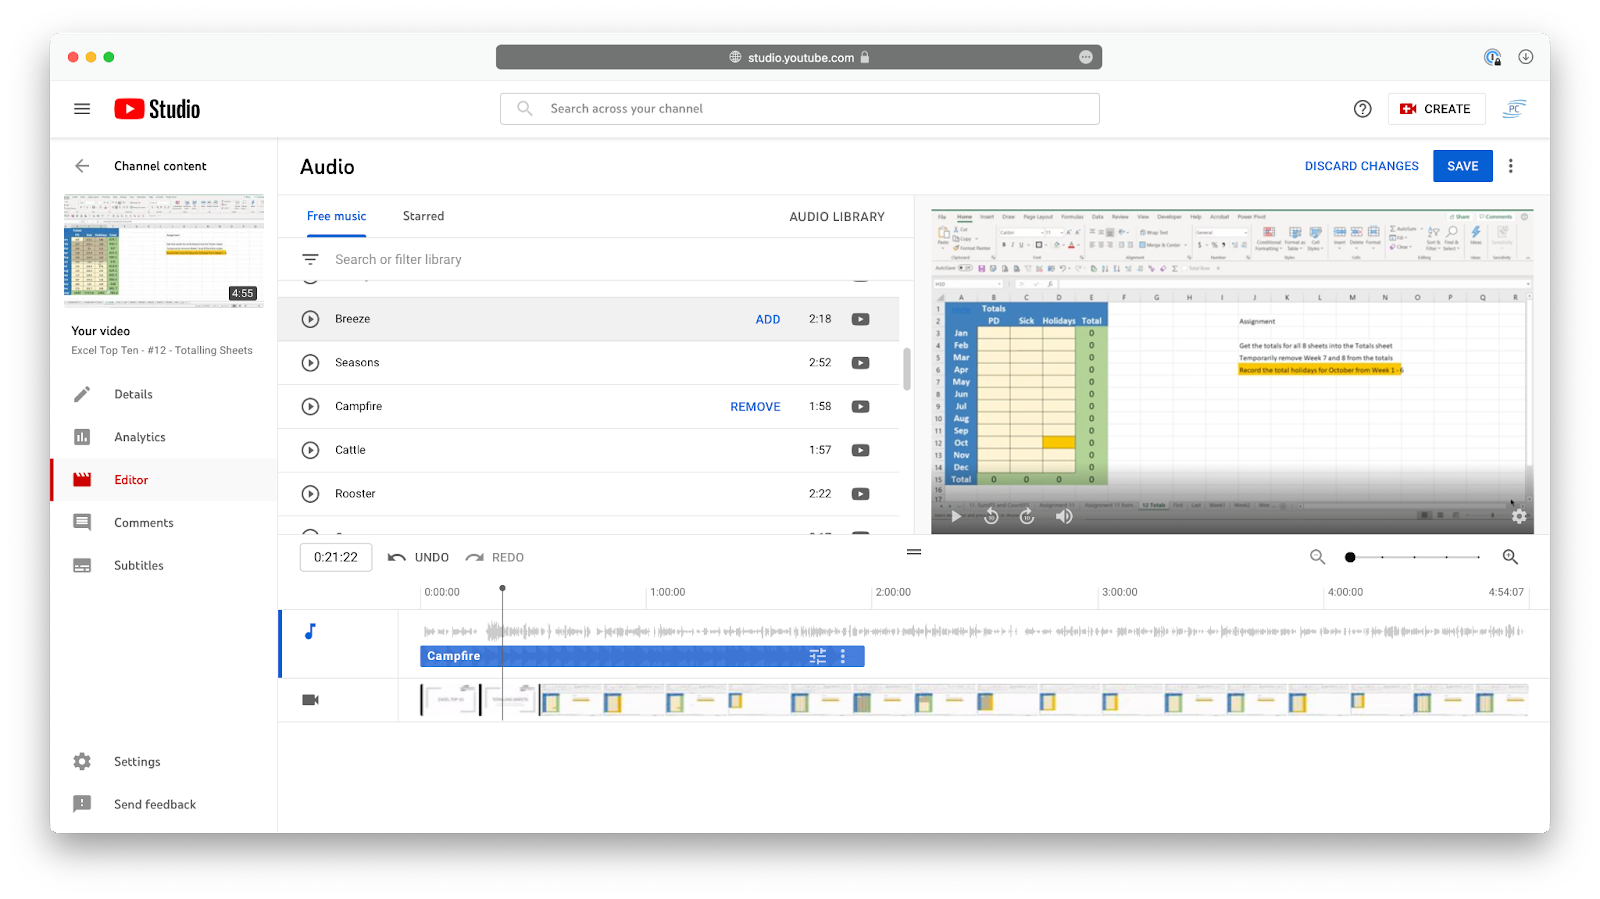
4. Add a soundtrack and other helpful elements
Watch any popular video on YouTube right now, and you’ll notice that they all have some music playing in the background. It could be in the intro or at the end. It could play while showing the reel. It could even be on while you’re talking (even if it’s quiet enough).
The point is that music makes videos more engaging, so make sure to take advantage of it! YouTube Studio Editor offers a free music library (here’s another link to a list of copyright free music) you can add to your videos right before uploading them.
Some other YouTube editor’s features you could use are subtitles and blur. Blur helps mask any sensitive or private information, while subtitles allow you to add text that would make your video more accessible overall.
5. Create a Storyboard
Storyboarding can save you a lot of time planning and editing your YouTube videos. A good storyboard can help keep your video focused on hitting the right points. They help you understand what transitions you need, and what clips you need to bring together.
What tools can you use for editing YouTube videos
While the AI YouTube video editing software described above is the easiest way to learn how to edit videos for YouTube, there’s lots of other high-quality third-party video editing software that you can switch to once YouTube’s features won’t be enough for you. We’ll list a few here, but here’s a more thorough review of the most popular video editing software.
1. Microsoft Movie Maker
The default video editing app on Windows for the longest time (since 2000) was Windows Movie Maker, which offered basic editing features, transitions, imports, etc.
In 2017, the standalone Movie Maker was discontinued and turned into Video Editor, which is part of the Microsoft Photos app.
Price: Free with windows
2. iMovie
For Mac users, iMovie is a free app with lots of powerful features, from creating trailers to coloring, to cropping, to stabilizing, etc.
If you don’t see iMovie in your Applications folder, you can get it for free in the App Store.
Price: Free with Apple
3. Final Cut Pro
For professionals, Apple offers a premium app called Final Cut Pro. It’s sold as a one-time payment of $299.
Final Cut Pro provides non-destructive editing with every feature even the most discerning professional can think of. Lots of major Hollywood movies have been edited using Final Cut Pro.
Price: $299
4. Adobe Premiere Pro
The most popular professional video editing software is Adobe Premiere Pro. Part of the Adobe Creative Cloud subscription, this app integrates natively with other Adobe products (e.g. Photoshop, Illustrator) and can be used for any video-editing tasks, whether they involve green screens or complex audio track mixing.
Price: Free trial, $20.99/month
5. Corel VideoStudio Pro
If you’re looking for something in-between consumer and professional markets, Corel VideoStudio Pro is a great choice.
This 79.99-dollar video editing app allows 4K editing, has a built-in speech to text converter for subtitles, makes it easy to apply filters and provides lots of project templates to get started quickly.
Price: $79.99
Create your first video digital product today
Learning how to edit YouTube videos is essential to promoting your channel and growing your audience. You can apply the same skills to monetizing the following you already have, with a solution like The Leap.
The Leap is a free AI-powered all-in-one creator store that enables creators to start earning money, right now.
We know that creating your very first few digital products can be a little overwhelming. (“It’s too time-consuming!” “Where do I even start?!”) That’s why we created a free tool that helps you build, promote, and sell digital products in record time – and with minimal effort.
Make the jump to The Leap. Try our all-in-one creator store for free today.